To date Google Chrome is the most utilized browser in the world. A title well earned with the number of great features it has to offer. Unfortunately, the best browser is also a monster usage of resources, even more so if you are using an older computer.
We have all experienced the frustration of being slowed down when using a web browser for work or even personal use. The cause of this might be what you are utilizing and not utilizing in your Google Chrome browser. Some computer users may not know how or where to even look for information on controlling Google Chrome in a more customized fashion.
In some cases if you are an experienced computer user, the lack of speed may out way the performance Chrome can appear to even provide.
No matter the basis for your desire to speed up Google Chrome, there are a number of ways to provide a faster browser speed for Chrome.
This article is going to cover 10 different, simple and effective ways to speed up Google Chrome:
- Getting Rid of Un-Needed Extensions
A number of Chrome extensions operate in the background to maintain the services, much like apps work in the background on a smartphone. You even manage the extensions in a similar fashion as an app on a smartphone.
As a result, the extensions consume an abundance of operating resources. You might have too many extensions enabled in Chrome (extensions you might not need or be using).
Having an over abundance of extensions operating could easily be the cause of slowed browser speed. The basic fix for this would be to delete or disable the extensions that are not in use.
In order to delete or disable a Chrome extension, click on the hamburger menu icon in the upper right corner of Chrome, then click “More Tools”. Then click on “Extensions” on the side menu.
This should direct you to the page the extensions are listed on. Once you have determined which extension you do not want, to disable the extensions, click in the “Checkbox” beside it. To completely remove the extension, click on the “Trashcan” icon beside it.
If there are extensions you do not use regularly, we suggest you simply disable them until further needed. If you are unsure if you are using or need an extension, just disable that as well. There is no need to remove or delete extensions unless otherwise determined by your usage.
- Enabling Chrome Prefetch
In order to next guess what link or page you might click on next, Chrome pre-loads them in a cache in the background, to allow the pages to load faster. Obviously this uses more data but it also makes for much quicker browsing.
In order to enable Chrome prefetch, click on “Settings” in the hamburger menu, choose “Show advanced options” at the very bottom of the page
Click on the checkbox beside “Use a predictive service to upload pages more quickly”, found under “Privacy”. If your internet plan is limited, we recommend you disable this function.
- Using the Chrome Data Saver
If you have a limited data plan or a slow connection, Chrome Data Saver could make a huge difference for you. Google servers can be utilized by Google Chrome to compress the size of web pages. This compression will make the pages load faster and use less bandwidth.
This feature is not included in Chrome as is, Google offers this Chrome extension as an add on you can install yourself.
Once you install the feature it will automatically start compressing data from web pages as you browse. Please note this extension is not compatible with web pages that are encrypted: web addresses that begin with “https”.
- Change Flash Plugins to Click to Load
Almost every website these days uses some sort of flash content like ads, videos or some other variety of interactive content. Loading this content can slow a browser down considerably. Aside from being an inconvenience to a power user, such content can be distracting from the task at hand.
You have the ability to make sure that unless you click on the content, it will not load. This will keep distractions to a minimum, lower bandwidth usage and make Chrome work even better.
To make the change to click and load, click on Chrome’s hamburger menu, click on “Content Settings” under “Privacy”. Under the “Plugins” section, scroll down to “Let me choose when to run plugin content” and select. When this is complete, flash content will only play when you click on it.
- Disabling Images
Although this would not be the recommended way to make Chrome faster, it might be the answer for you. There is an option within Chrome that allows you to disable all the images on a webpage, preventing them from loading.
You might find the images in the content you are interested in to be informative and useful and this may not be the solution for you. If you can live without the images, these are one of the big reasons some web pages take forever to load. If your interest is purely in reading, disabling the images can easily speed the load time of a webpage.
In order to disable the images in Chrome go to the “Content Settings” again, under the “Images” section, select “Do not show any images”.
- Clearing Chrome Data
Chrome will slow down because of the data it is keeping a hold of, like cached content, browsing history and cookies. If it has been awhile since you have cleared this data, that may be the cause for slowed browsing.![]()
In the Chromes hamburger menu select “History”, or you can press ctrl+H, click on “Clear browsing data” at the top.
Once there check the checkboxes beside the different data you would like removed, click on “Clear browsing data” and the data will be deleted.![]()
It is not necessary to remove passwords that have been saved and auto fill form information if you make use of these things in your daily browsing. Neither have a huge effect on the browser.
Experimental Features of Google Chrome
There are also a few Chrome Experimental Features that can be very useful in speeding up the performance of Chrome. Make note that these features are called experimental for a reason and may not work correctly on computers.
If you have an adverse experience while using any of these features, you should remove any changes you made and revert to your previous Chrome profile.
To find and access the Experimental Features, type “chrome://flag” in the address bar of your browser and search. Use “Ctrl+F” to find the experimental features touched on in this article.
- Changes to Tile Width and Height
By allocating more RAM to height and width, you will make scrolling better and less stuttering while moving through a web page.
Only make this adjustment if you have 4GB of RAM, that should be sufficient.
In the Find dialog type “Default tile”. There you should find both Default tile width and height options. Using the drop down menus located under them to change from “Default” to 512. It is also possible to allocate more or less, 512 works best for most people.
- Enabling Experimental Canvas Features
To date this feature is still under development that grants permission to Chrome to use canvases to speed up the loading of a web page. What this may do is eliminate varying types of content when loading a web page. The changes would not be noticeable, they are there.
To find “Experimental canvas features” and click on the “Enable” button shown below, this will enable the feature.
- Enabling Fast Window and Tab Closing
This feature allows Chrome to appear to be closing tabs and windows faster, when it is really just hiding the process from you while it is happening. Although Chrome is not actually speeding up the closure quicker, the disappearance of the window faster in appearance allows the user to continue browsing during the operation.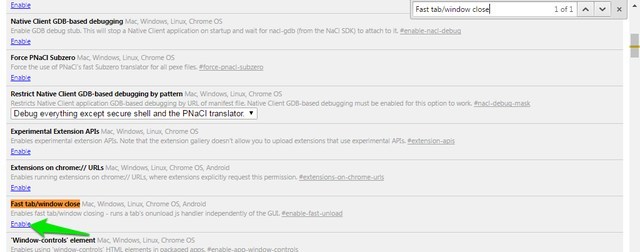
Just search for “Fast tab/window close” and click on the “Enable” button shown below, this will enable this feature.
- Enabling QUIC Protocol
Another work in development, this connection protocol was created by Google to prevent multiple trips to the server in creating a connection. An improvement over UDP, taking less trips to make a connection, is less time spent creating a connection and loading a page. Typically, two or three trips are needed before a connection is secured with a server.
Just search for “Experimental QUIC protocol” and use the drop down menu shown to enable the feature.
Once any of the experimental features mentioned are enabled, you will need to re-launch Google Chrome. Find the “RELAUNCH NOW” button located at the bottom of the screen and click on it and see if Chrome speeds up.
Notice Any Difference in Chrome’s Performance?
The ways mentioned in this article should be an adequate and noticeable change in the speed of browsing while using Google Chrome.
When implementing any of these recommended changes, note how they will change your browsing experience and the affect that may have on your productivity and whether that is a positive or negative.
We find the most effective ways of increasing the speed of Chrome in this article to be disabling images and setting all plugins for click and play, these settings may not be for everyone.
Although it is doesn’t happen often, keep in mind the experimental features noted here might also have an adverse effect on your browser and slow it down. If your browser does slow down (rare), just set your options back to the defaults.
Please let us know your thoughts on these methods in the comments section. If you know additional ways to speed up Google Chrome, please share those as well. We would like to keep sharing the tips for other users.


This article needs to be updates as the layout of the settings has changed and I couldn’t find some of them like, prefetch.